
Android - Working with REST API
Many Android apps rely on remote servers to function, as in many cases it is not practical to have all the data locally. A common approach is for the servers to offer an API, and for the Android apps to access data through that API. In this tutorial, we will learn to access data through a REST API, using the 'Retrofit' library. We will build an "Currency Converter" application that converts an amount of one currency to an equivalent amount of other currency. As the exchange rates change frequently, it is impractical to have fixed rates stored locally and rely on them. Instead, every time our user requests a conversion, we will ask a remote API for current exchange rates, and use them for conversion.
Prerequisites: you should know what a REST API is, you should know JSON, you should know about the CRUD operations over HTTP
Note: you can download this tutorial project at https://gitlab.lrz.de/ga94vif/CurrencyConverter
About Retrofit: 'Retrofit' is an open source library for interfacing HTTP API and requests. As we are accessing a REST API for our exchange rates, we need to implement proper communication over HTTP. We can implement the communication manually using Android's 'HttpURLConnection' and related classes, or we can use 'Retrofit' library, which internally is implemented pretty much the same way as in the manual case, but offer the programmers a much less verbose and more readable interface for implementing the communication.
About Exchange Rate API: For our tutorial, we will use the free 'Foreign Exchange Rates API' that provides the current exchange rates published by the European Central Bank. Visit the API's homepage here. For our tutorial, we will only use one of the API's provided usages, namely requesting exchange rates between two currencies.
Try click the GET request URL and see what we would get in return. If everything works fine, we should get a JSON formatted string like below.
{"base":"EUR","date":"2018-06-29","rates":{"USD":1.1658}}
The JSON should be quite readable and self-explanatory to us: to the date of 29.06.2018, 1 EUR converts to 1.1658 USD.
Now that we have a quite good understanding of our API, let's build our application. In Android Studio, click File -> New -> New Project. Name the application "CurrencyConverter", target API 26, and add Empty Activity named 'MainActivity', check "generate layout file" named 'activity_main'.
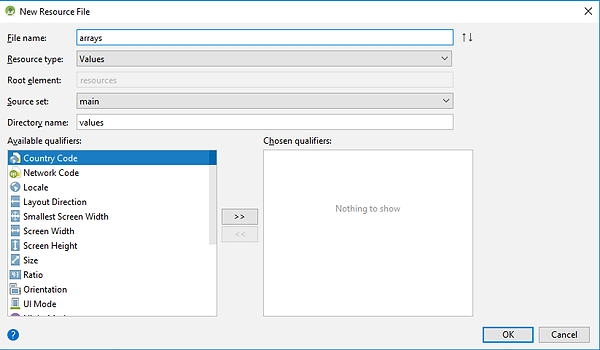
In your Project Inspector in Android Studio, right click on the 'res' folder -> New -> New Resource File. Create a new resource file called 'arrays'. This file will contain the codes of currencies our application will support. Edit the file to look like below.

Edit your 'activity_main.xml' to look like here. After that, run the application and inspect the UI.

Looks great! Except that for now, our app does nothing. As mentioned before, we want to use the Exchange API for our conversion. Let's get into it. First, we need to create all the necessary interfaces in order to communicate with the API. First of all, we need to set up our application to use 'Retrofit' library and to be able to access the network. Add this permission to your 'AndroidManifest.xml' file:
<uses-permission android:name="android.permission.INTERNET" />
Add these dependencies into your 'build.gradle' file:
implementation 'com.squareup.retrofit2:retrofit:2.4.0'
implementation 'com.squareup.retrofit2:converter-gson:2.4.0'
Now, in the package where our 'MainActivity' class is, create a new package named 'api'. We will put all new classes needed to communicate with the Exchange API there, to have our project more organized. First, we need a client class that will allow the connection to the remote API. In your 'api' package, create a new class named 'RetrofitExchangeRatesClient' and have it look like below.

Now, remember our JSON response from the API?
{"base":"EUR","date":"2018-06-29","rates":{"USD":1.1658}}
Once we get this response, we can parse the JSON string to get the exchange rate. Parsing the JSON string in this case is easy, but if you are working with APIs that returns data of much more volume, that would be a lot of work, error-prone as well. Fortunatelly, 'Retrofit' comes with a GSON converter which converts the JSON string to corresponding Java class. Of course, we need to define that class first.
In your 'api' package, create 2 new classes called 'ExchangeRateObject' and 'ExchangeRatesWrapperObject', and have them look like below. Notice the correspondence between the 'ExchangeRatesWrapperObject' and the JSON response.


Now we need to define our service that we will use to communicate with the Exchange API. In your 'api' package, create an interface called 'ExchangeRatesApiService' and have it look like follow. Notice the correspondence between the 'getExchangeRates' function and the GET request for getting the exchange rate:
GET https://exchangeratesapi.io/api/latest?base=EUR&symbols=USD HTTP/1.1

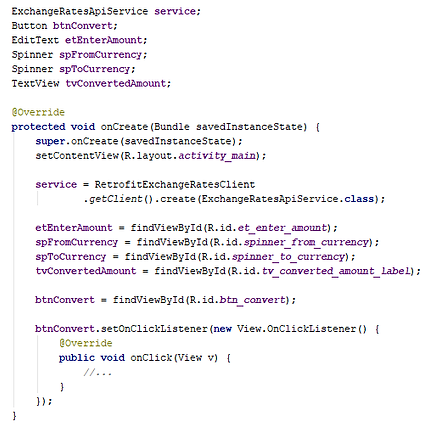
In your 'MainActivity', create references to your UI elements. Define the "convert button" to call a function that will do the conversion. Take care of bad inputs.

Finally, we implement the 'convertAmount(...)' function to realize the conversion.

Notice that we use our 'ExchangeRatesApiService service''s 'getExchangeRates(...)' function to perform our 'GET' request. The 'enque' function makes sure that this request is run asynchronously on another thread, not interfering with the main UI thread, to comply with Android's best practices. Once we recieve the respond from our remote API, 'onResponse(...)' is called on the main UI thread, there we can extract the exchange rate from our wrapper object, realize the conversion and update the UI accordingly. In case of failure (timeout, or no internet connection), 'onFailure(...)' is called.
Now, try out the application!
At the end, I hope you get a better understanding of the topic, and thank you for following this tutorial till the very end. Cheers, Dat.
